- Getting Started
- Administration Guide
-
User Guide
- An Introduction to Wyn Enterprise
- Document Portal for End Users
- Data Governance and Modeling
- Working with Resources
- Working with Reports
-
Working with Dashboards
- Dashboard Designer
- Selecting a Dataset
- Data Attributes
- Dashboard Scenarios
- Dashboard Templates
- Component Templates
- 3D Scene
- Explorer
- Visualization Wizard
- Data Analysis and Interactivity
- Dashboard Appearance
- Preview Dashboard
- Export Dashboard
- Dashboard Lite Viewer
- Using Dashboard Designer
- Animating Dashboard Components
- Document Binder
- Dashboard Insights
- Add a New Page in Dashboard Designer
- View and Manage Documents
- Understanding Wyn Analytical Expressions
- Section 508 Compliance
- Subscribe to RSS Feed for Wyn Builds Site
- Developer Guide
Create a Hierarchy Field
Hierarchy fields help separate the details on different levels, keeping the dimensions in an organized manner as well as revealing additional details as you drill-down the data.
Wyn Dashboards automatically creates the date hierarchies by arranging the date in hierarchical order (Year > Month > Week > Day) when a dataset is added to any scenario.
You can create custom hierarchies for dimensions to arrange the dimensions on different levels of details. For example, you can define a 'Product hierarchy' as Product line > Product type > Product, as shown below.
Create a Hierarchy Field
- In the Data Binding tab
 , navigate to the dimension for which you want to create the hierarchy.
Note that you can create hierarchy for the dimensions only, and not for measures.
Go to the dimension's Settings
 and select Create Hierarchy Field...
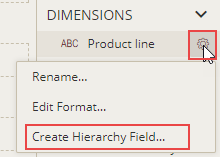
In the Create Hierarchy Field dialog, drag the dimensions from the left pane to the right pane in the order of the hierarchy. You can rearrange the dimensions in a hierarchy by dragging them upward or downward.
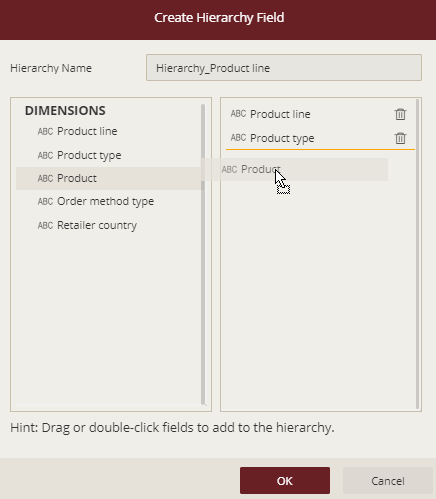
You can also change the hierarchy name as required. By default, the Hierarchy Name is Hierarchy_parentfieldname.
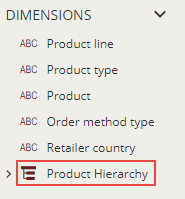
Observe that a new hierarchy field is created alongside other dimensions.
Preview the Dashboard.
The scenario using the hierarchy fields show Expand Group (+) and Collapse Group (-) options. Click the Expand Group (+) and Collapse Group (-) to drill-down or drill-up into or from the hierarchy as shown.
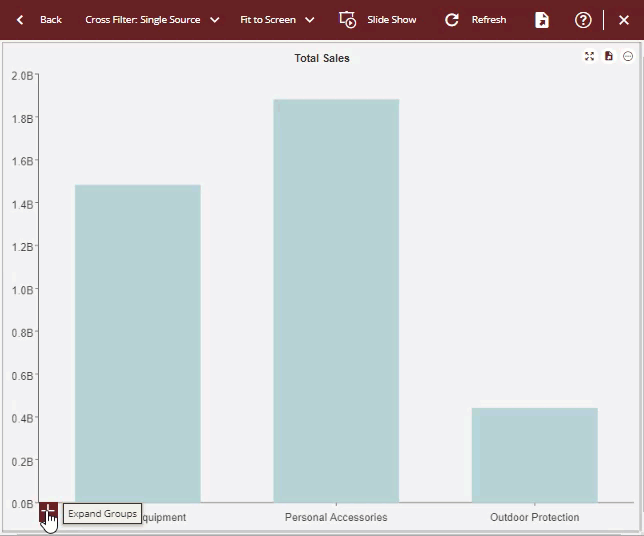
The preview shows 'Product line' along the X-axis of the Column Chart scenario. As you drill-down the hierarchy by one level, you see additional details on the 'Product type', and on further drill-down, you see the details on the 'Product'.