- Getting Started
- Administration Guide
-
User Guide
- An Introduction to Wyn Enterprise
- Document Portal for End Users
- Data Governance and Modeling
- Working with Resources
- Working with Reports
-
Working with Dashboards
- Dashboard Designer
- Selecting a Dataset
- Data Attributes
- Dashboard Scenarios
- Dashboard Templates
- Component Templates
- 3D Scene
- Explorer
- Visualization Wizard
- Data Analysis and Interactivity
- Dashboard Appearance
- Preview Dashboard
- Export Dashboard
- Dashboard Lite Viewer
- Using Dashboard Designer
- Animating Dashboard Components
- Document Binder
- Dashboard Insights
- View and Manage Documents
- Understanding Wyn Analytical Expressions
- Section 508 Compliance
- Subscribe to RSS Feed for Wyn Builds Site
- Developer Guide
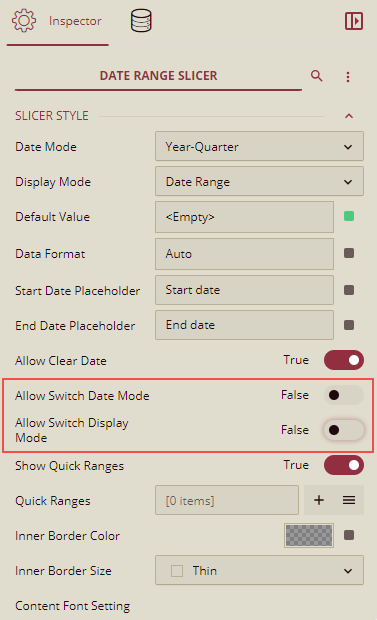
Switch Date Mode and Display Mode
You can switch the date mode and display mode in date range slicers when previewing the dashboard with the help of the following two properties:
Allow Switch Date Mode
Allow Switch Display Mode
The default value for these two properties is False.
Allow Switch Date Mode
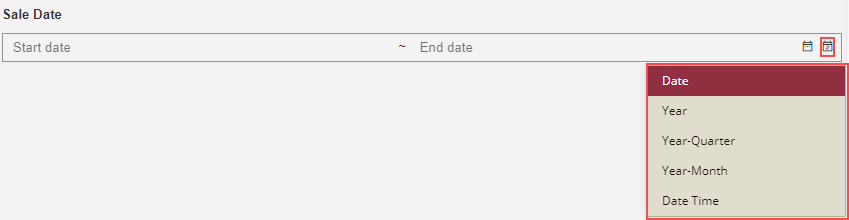
If the Allow Switch Date Mode is set to True, there is a new icon in the action bar.
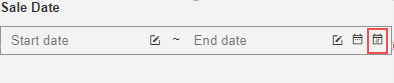
You can switch the date mode by selecting any mode in the popup.
Note: When the Allow Switch Date Mode, is False, then in the preview you will view only that "Date Mode" which is selected in the designer.
Example
The example below will show the use of the Allow Switch Date Mode property.
On the designer, select the Date Mode as Date and keep the Allow Switch Date Mode property to False.
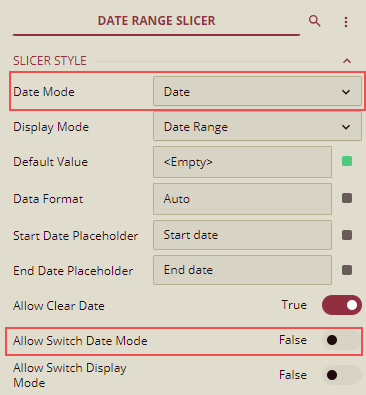
On the preview, you will see Date Mode as Date only, and there will be no other option to change the Date Mode.

Now on the designer, select the Date Mode as Date and set the Allow Switch Date Mode property to True.
On the preview, you will see a new icon to switch the date mode by selecting any mode in the popup.

Allow Switch Display Mode
If the Allow Switch Display Mode is enabled, there is a new icon in the action bar.
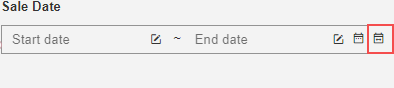
This is a toggle button, and the display mode of the date range slicer will be changed by clicking this icon.

Note: When the Allow Switch Display Mode, is False, then in the preview you will view only that "Display Mode" which is selected in the designer.
Example
The example below will show the use of the Allow Switch Display Mode property.
On the designer, select the Display Mode as Date Range and keep the Allow Switch Display Mode property to False.
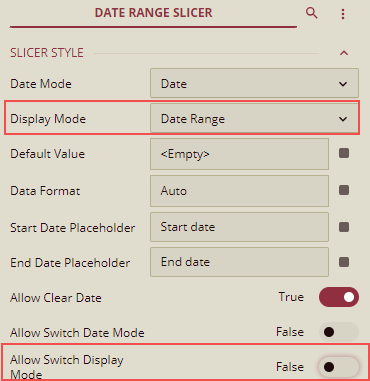
On the preview, you will see Date Display as Date Range only and there will be no other option to change the Display Mode.

Now on the designer, select the Display Mode as Date Range and set the Allow Switch Display Mode property to True.
On the preview, you see a new toggle button and the display mode of the date range slicer will be changed by clicking this icon. Here in this example, it is changed from Date Range to Date.

Conversion rules
If the slicer has a value before changing the date mode, you can convert the value to a new value in order to match the new date mode.
Rule 1: Display Mode selected is Date
When Display Mode is selected as Date and Date Mode is selected as Date. Now in the preview, you change the date mode to an option other than Date, then the conversion rules listed in the table below will be applicable.
To From | Year | Quarter | Month | Date | DateTime |
|---|---|---|---|---|---|
Year | NA | It will change to the first quarter of the year. Example: 2022 will change to 2022 Q1 | It will change to first month of the year. Example: 2022 will change to 2022 Jan | It will change to the first date of the year. Example: 2022 will change to 2022/01/01 | It will change to first second of the year. Example: 2022 will change to 2022/01/01 00:00:00 |
Quarter | It will change to the year of the quarter in. Example: 2022 Q1 will change to 2022 | NA | It will change to the first month of the quarter. Example: 2022 Q1 will change to 2022 Jan | It will change to the first date of the quarter. Example:2022 Q1 will change to 2022/01/01 | It will change to the first second of the quarter. Example: 2022 Q1 will change to 2022/01/01 00:00:00 |
Month | It will change to the year of the month in. Example:2022 Jan will change to 2022 | It will change to the quarter of the month in. Example: 2022 Jan will change to 2022 Q1 | NA | It will change to the first date of the month. Example: 2022 Jan will change to 2022/01/01 | It will change to the first second of the month. Example: 2022 Jan will change to 2022/01/01 00:00:00 |
Date | It will change to the year of the date in. Example: 2022/01/01 will change to 2022 | It will change to the quarter of the date in. Example: 2022/01/01 will change to 2022 Q1 | It will change to the year of the date in. Example: 2022/01/01 will change to 2022 Jan | NA | It will change to the first second of the month. Example: 2022 Jan will change to 2022/01/01 00:00:00 |
DateTime | It will change to the year of the date-time in. Example: 2022/01/01 10:00:00 will change to 2022 | It will change to the quarter of the date time in. Example: 2022/01/01 10:00:00 will change to 2022 Q1 | It will change to the year of the date-time in. Example: 2022/01/01 10:00:00 will change to 2022 Jan | It will change to the date of the date-time in. Example: 2022/01/01 10:00:00 will change to 2022/01/01 | NA |
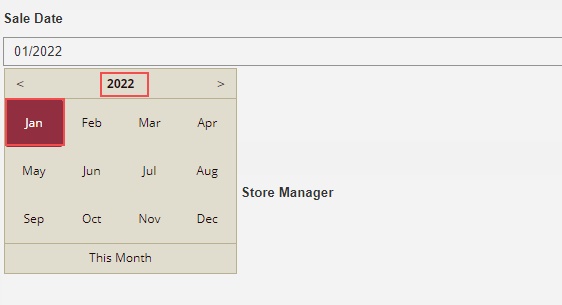
Example: If the current Date Mode is Year, and the selected year is 2022.
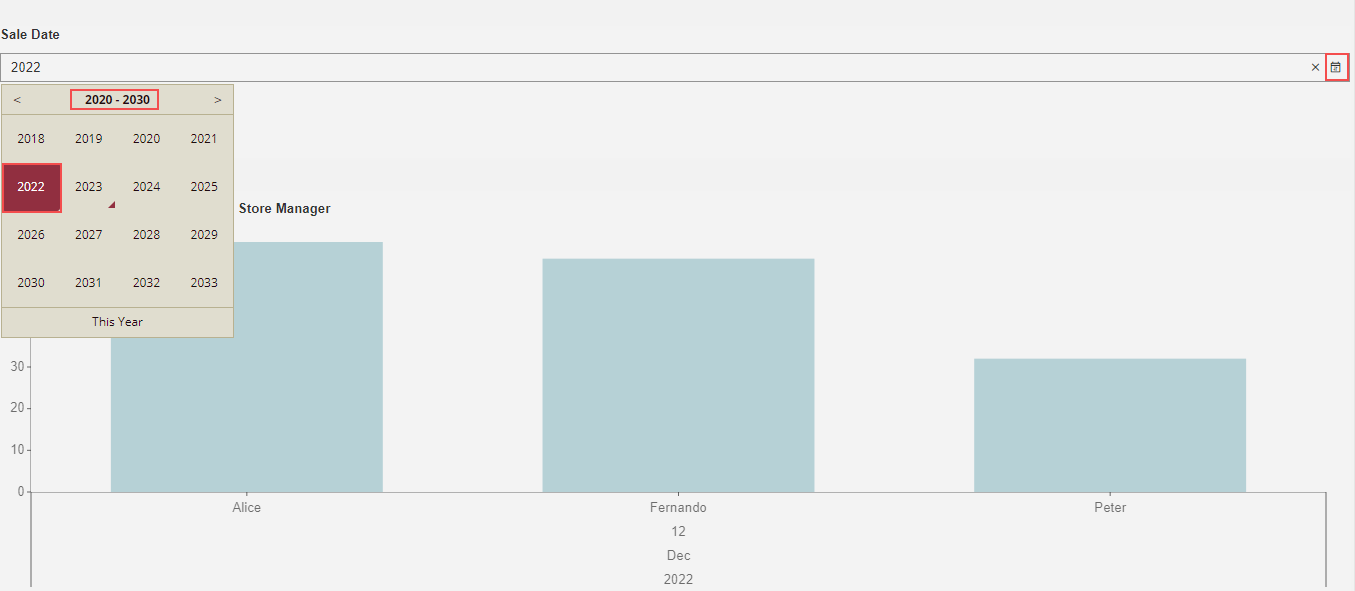
Now switch the date mode to Month, by default, the selected date will be changed to 2022 Jan.
Rule 2: Display Mode selected is Date Range
When Display Mode is selected as Date Range and Date Mode is selected as Date. Now in the preview, you change the date mode to an option other than Date, then the conversion rules listed in the table below will be applicable.
To From | Year | Quarter | Month | Date | DateTime |
|---|---|---|---|---|---|
Year | NA | Date range will change from the first quarter of the start year to the last quarter of the end year. | Date range will change from the first month of the start year to the last month of the end year. | Date range will change from the first date of the start year to the last date of the end year. | Date range will change from the first second of the start year to the last second of the end year. |
Quarter | Date range will change from the year of the start quarter in to the year of the end quarter in. | NA | Date range will change from the first month of the start quarter in to the last month | Date range will change from the first date of the start quarter to the last date of the end quarter of the end quarter in. | Date range will change from the first second of the start quarter to the last second of the end quarter. |
Month | Date range will change from the year of the start month in to the year of the end month in. | Date range will change from the quarter of the start month in to the quarter of the end month in. | NA | The Date range will change from the first date of the start month to the last date of the end month. | Date range will change from the first second of the start month to the last second of the end month. |
Date | Date range will change from the year of the start date in to the year of the end date in. | Date range will change from the quarter of the start date in to the quarter of the end date in. | Date range will change from the month of the start date in to the month of the end date in. | NA | The Date range will change from the first second of the start date to the last second of the end date. |
DateTime | Date range will change from the year of the start date time in to the year of the end date time in. | Date range will change from the quarter of the start date time in to the quarter of the end date time in. | Date range will change from the month of the start date time in to the month of the end date time in. | Date range will change from the date of the start date time in to the date of the end date time in. | NA |
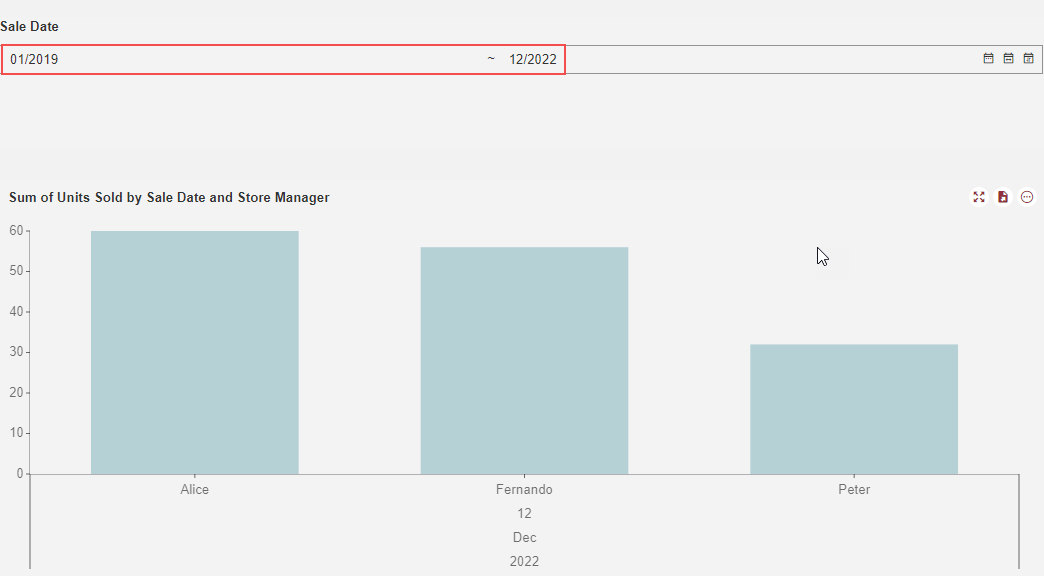
Example: If the current Date Mode is Year, and the selected year is 2019-2022.
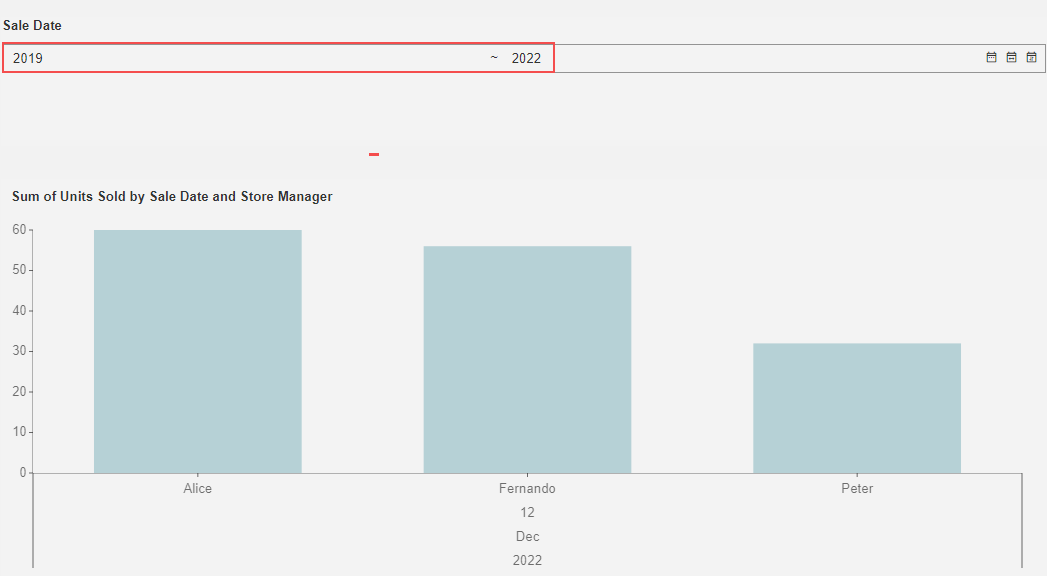
Now switch the date mode to Month, by default, the selected date range will be changed to 2019 Jan to 2022 Dec.
Custom Range and Quick Ranges
When the Display Mode selected is Date Range, then on the preview, you can see the options for the Quick Ranges and Custom Range.
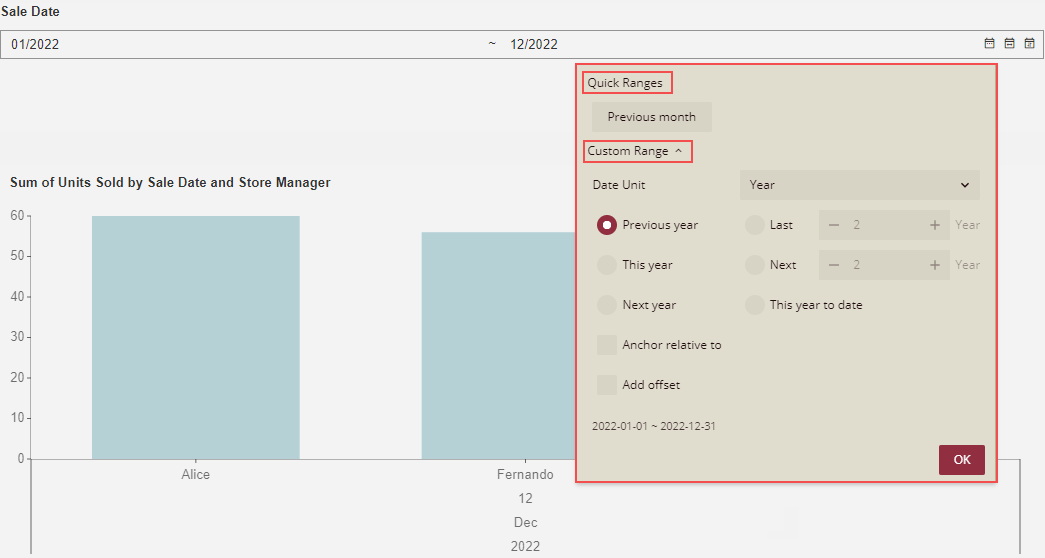
You can set the custom range from here by selecting the Date Unit and its related options and clicking the OK button.
Quick Range: You can set this from the dashboard designer under the Inspector tab, by clicking the Add option for the Quick Ranges.
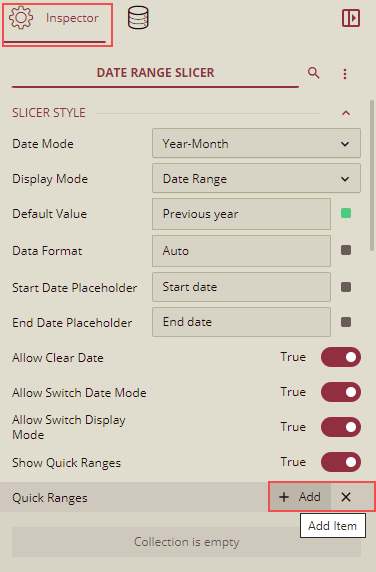
Set Quick Range dialog box is displayed.
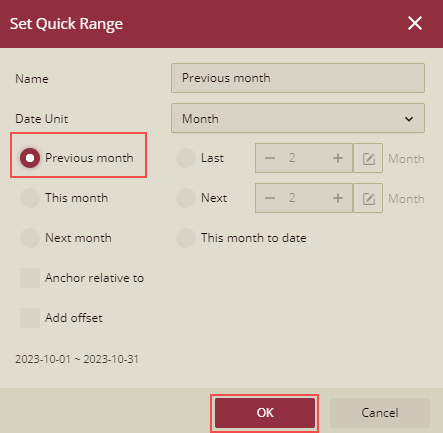
You can set the quick range and click the OK button. In this example we have selected Date Unit as Previous Month.