- Getting Started
-
Administration Guide
-
Get Started with Administering Wyn Enterprise
- System Requirements
- Installing on Windows
- Installing on Linux
- Installing using Docker
- License Wyn Enterprise
- Deploying with HTTPS
- Deploying with Reverse Proxy
- Deploying to Azure App Service (AAS)
- Deploying to Azure Kubernetes Service (AKS)
-
Deploying to AKS using Helm Chart
- Deploying to Local Kubernetes
- Deploying to Kubernetes Cluster using Helm Chart
- Deploying as a Virtual Directory or Sub-Application
- Deploying to Amazon ECS
- Deploying to Amazon EKS using Helm Charts
- Deploying in a Distributed Environment
- Migration from ActiveReports Server 12
- Upgrade Wyn Enterprise to Latest Version
- Logging on to the Administrator Portal
- Ports in Firewall
- Configuration Settings
- Account Management
- Security Management
- System Management
- Document Management
- How To and Troubleshooting
-
Get Started with Administering Wyn Enterprise
- User Guide
- Developer Guide
Deploying to AKS using Helm Chart
Azure Kubernetes Service (AKS) is a cloud-based container platform designed by Microsoft Azure to simplify the deployment, management, and scaling of containerized applications such as Wyn Enterprise. With AKS, users can create and manage Kubernetes clusters easily taking advantage of the advanced technology features. AKS also provides security mechanisms to help protect the application and its data, along with robust networking capabilities.
By combining the capabilities of AKS with Helm Charts users can streamline the process of deploying, upgrading, and maintaining complex applications such as Wyn Enterprise on the Kubernetes cluster. Helm charts simplify the deployment process by encapsulating all the necessary configurations, dependencies, and resources required for an application to run within Kubernetes. Wyn Enterprise integrates with the AKS cluster using Helm charts to provide simplified cluster management, auto-scaling, and monitoring features. For more information on Helm Charts see the Helm Documentation.
In this help article, you will learn the deployment process of Wyn Enterprise on Azure Kubernetes Service using Helm charts.
Before deploying the Wyn Enterprise application in the AKS cluster using Helm Chart ensure the following;
You have an active Azure subscription.
You have a database instance that can be accessed externally.
Deployment Steps
Follow the below instructions to deploy the Wyn Enterprise application in an AKS cluster using Helm Chart,
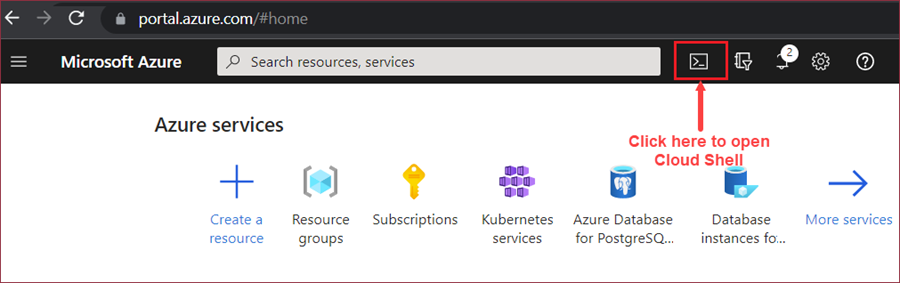
Log in to your Azure portal and open the Cloud Shell.
Create a resource group using the following command;
az group create --name wynRscGrp --location southeastasiaCreate an AKS cluster using the following command;
az aks create --resource-group wynRscGrp --name wynAKSCluster --location southeastasia --generate-ssh-keysConnect to AKS Cluster: In the Azure portal, navigate to All Resources >> your AKS Cluster >> Overview >> Connect and run the following two commands,
Command 1: Set the cluster subscription using -
az account set --subscription a1608493-18ca-4b65-a726-91372c708c4bCommand 2: Download the cluster credentials using -
az aks get-credentials --resource-group wynRscGrp --name wynAKSCluster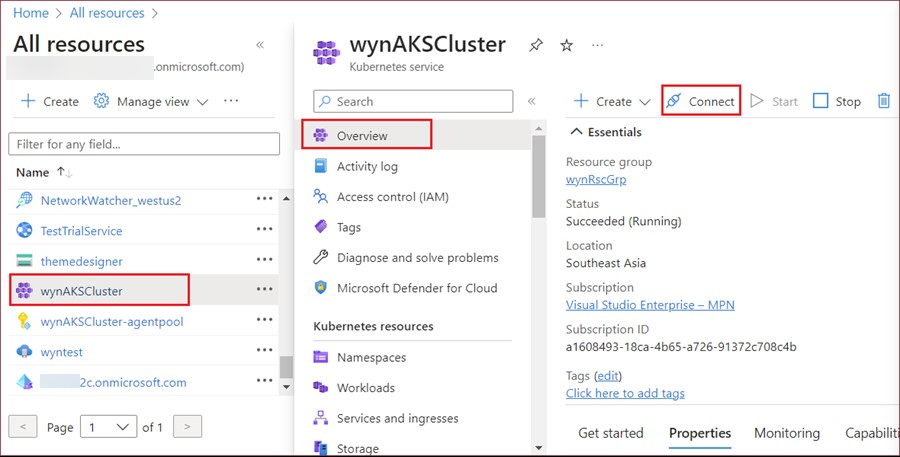
Enable Application Routing Add-on: In the Azure Portal, navigate to All Resources >> your AKS Cluster >> Services and ingress, click the Create button and select Ingress.

Add Helm Repository: Add the helm repository using the following command;
helm repo add wyn https://wyntools.blob.core.windows.net/packages/helm/
helm repo update
Note: Helm chart repository https://wyntools.blob.core.windows.net/packages/helm/ is used for demonstration purpose only.
Create Docker Image Pulling Secret: In case you are using a private docker repository, use the following mandatory command. And, if you do not use a private docker repository skip this step.
kubectl create secret docker-registry {secret_name} \
--docker-server={docker_server} \
--docker-username={user_name} \
--docker-password={password}
Use the following command to fetch the secret;
kubectl get secretCreate PVC Resources: To provide dynamically persistent volumes, Wyn Enterprise uses the storage class azurefile. Do the following to create the PVC resource,
i) Prepare a YAML file and give it a name say pvc.yaml,
apiVersion: v1
kind: PersistentVolumeClaim
metadata:
  name: pvc-wyn-data
spec:
  accessModes:
    - ReadWriteMany
  storageClassName: azurefile
  resources:
    requests:
      storage: 30Gi
ii) Use the following command to create the PVC resource,
kubectl apply -f pvc.yamlFetch the PVC resource using the following command,
kubectl get pvcCreate Values File: Prepare a values YAML file and give it a name say wyn-values.yaml. The following is a sample instance from a values file,
pvcName: pvc-wyn-data
ingress:
  enabled: true
  apiVersion: networking.k8s.io/v1
  name: wyn-ingress
  annotations:
    kubernetes.io/ingress.class: webapprouting.kubernetes.azure.com
  hosts:
    - paths:
        - /
identityServerUrl: http://wyn-server:51980
database:
  provider: {database_provider}
  connectionStrings:
    dataExtraction: {database_connection_string}
    serverStorage:  {database_connection_string}
    identityServer: {database_connection_string}
# importSamples: true
# singleServer: false
# logLevel: Information
# pathBase: yourPathBase
# requireHttps: false
# removeLineBreakFromConsoleLog: true
# dataWarehouse:
#   provider: DuckDB
#   connectionString: Data source=/app/analysis.db;
# cookie:
#   shareCookie: false
#   sameSite: Lax
#   secure: false
# sso:
#   authenticationProtocol: OIDC|CAS
#   scheme: yourSchemeName
#   disabled: false
#   allowIncognizantUser: true
#   casServerUrlBase: https://localhost:8443/cas
#   casServerLogoutUrl: https://localhost:8443/cas/logout
#   casServerProtocolVersion: 3
#   authority: https://your.authority.com
#   metadataAddress: https://your.authority.com/.well-known/openid-configuration?uid=xxx
#   clientId: yourClientId
#   clientSecret: yourClientSecret
#   scopes:
#     - openid
#     - profile
#     - email
#   callbackPath: /signin-oidc
#   responseType: code id_token
#   responseMode: from_post
#   requireHttpsMetadata: false
#   getClaimsFromUserInfoEndpoint: true
#   saveTokens: true
#   usePkce: false
#   claimMappings:
#     - key: sub
#       value: sub
#     - key: name
#       value: nickname
# cors:
#   allowedOrigins:
#     - http://localhost:3000
#     - http://localhost:8080
#   exposedHeaders:
#     - Options
#     - Location
server:
  enabled: true
  replicas: 1
  # resources:
  #   requests:
  #     cpu: "1"
  #     memory: "2Gi"
  #   limits:
  #     cpu: "2"
  #     memory: "4Gi"
analysisDbService:
  enabled: false
schedulerService:
  enabled: true
memoryDbService:
  enabled: true
dataSourceService:
  enabled: true
cotWorker:
  enabled: true
  replicas: 1
reportingWorker:
  enabled: true
  replicas: 1
dashboardWorker:
  enabled: true
  replicas: 1
To deploy Wyn using Helm chart, use the following command,
helm install wyn -f wyn-values.yaml wyn-dev/wyn-enterpriseYou can also specify a Namespace when deploying Wyn using the following command,
helm install wyn -f wyn-values.yaml wyn-dev/wyn-enterprise --namespace wyn --create-namespaceFetch the Pod Status using the following command and wait until all the pods are ready,
kubectl get podWhen the deployment is complete, fetch the public IP address using the following command,
kubectl get ingress -A
From the output of the above command, you will get the public IP address. Use the public IP address to visit the Wyn Enterprise application.
Configure Multiple Servers and Workers: To enable multiple servers and workers, specify the replica number in the values YAML file. The following sample is an instance from the values YAML file,
    server:
enabled: true
replicas: 2
analysisDbService:
enabled: false
schedulerService:
enabled: true
memoryDbService:
enabled: true
dataSourceService:
enabled: true
cotWorker:
enabled: true
replicas: 2
reportingWorker:
enabled: true
replicas: 2
dashboardWorker:
enabled: true
replicas: 2
Note: To enable multiple servers, register a Multiple-server license in the Admin Portal of Wyn Enterprise. Use the following command to view the running status of pods -
kubectl get pod. This will list out all the services and workers running at the moment. You can also see all the services and workers running on the Admin Portal of the Wyn Enterprise application.
To Uninstall Wyn Application
To uninstall the Wyn Enterprise application using Helm chart use the following command,
helm uninstall wynIn case a namespace was specified when installing the Wyn application, you need to specify the namespace in the above command as shown below,
helm uninstall wyn -n wyn