- Getting Started
-
Administration Guide
-
Get Started with Administering Wyn Enterprise
- System Requirements
- Installing on Windows
- Installing on Linux
- Installing using Docker
- License Wyn Enterprise
- Deploying with HTTPS
- Deploying with Reverse Proxy
- Deploying to Azure App Service (AAS)
- Deploying to Azure Kubernetes Service (AKS)
- Deploying to AKS using Helm Chart
- Deploying to Local Kubernetes
- Deploying to Kubernetes Cluster using Helm Chart
- Deploying as a Virtual Directory or Sub-Application
- Deploying to Amazon ECS
- Deploying to Amazon EKS using Helm Charts
- Deploying in a Distributed Environment
-
Migration from ActiveReports Server 12
- Upgrade Wyn Enterprise to Latest Version
- Logging on to the Administrator Portal
- Ports in Firewall
- Configuration Settings
- Account Management
- Security Management
- System Management
- Document Management
- How To and Troubleshooting
-
Get Started with Administering Wyn Enterprise
- User Guide
- Developer Guide
Migration from ActiveReports Server 12
Wyn Enterprise provides a migration tool that enables the users to transfer the ActiveReports Server 12 resources into Wyn Enterprise. These resources include reports, datasets, data sources, master reports, semantic reports, semantic models, document tags, images, report schedules, and themes. The migration tool takes the advantage of the enhanced business intelligence tools provided by Wyn Enterprise. You can also avoid recreating resources in your new Wyn Enterprise instance by using the migration tool.
The migration tool is a .NET Core console application that runs on Windows, Linux, or macOS.
Note: Please contact support, wyn.experts@mescius.com for the latest migration tool.
Setting Up Migration Tool
You must first configure the migration tool to locate the hosted instances of ActiveReports Server and Wyn Enterprise as well as specify databases to store the migrated documents.
This can be done by editing the settings in the configuration file appsettings.Production.json inside the migration tool's folder.
The migration script works in the following sequence:
ActiveReports Server - Locates the hosted instance of the ActiveReports Server containing the resources to be migrated. Fill the following arguments in the "ARS" section of the JSON file.
"ARS": {
       "URL": "";
       "User": "";
       "Password": "";
       "Timeout": 200000
},
URL of the hosted instance of ActiveReports Server starting with "http://" or "https://"
User & Password with administrator privileges on ActiveReports Server for uninterrupted execution of the export web API for the tool.
Wait time before ActiveReports Server request times out. It accepts a positive value in milliseconds.
This option is recommended if you have large data models or embedded datasets and data sources in your reports.
Wyn Server - Locates the instance of the Wyn Enterprise Server that is the destination for the resources.
Provide a path in JSON that corresponds to the installation path of Wyn Enterprise.
"WynServer": {
        "Path": ""
}
Default path for Windows - C:\Program Files\Wyn Enterprise\Server
Default path for Linux - \opt\Wyn\Server
Wyn Identity - Locates the Wyn Enterprise identity server and gains access to the Wyn Enterprise server.
Provide the URL and user credentials with administrative access to the hosted instance of the Wyn Enterprise Identity server.
"WynIdentity": {
        "URL": "",
        "Username": "",
        "Password": ""
},
Data Extraction and Storage - Locates the Wyn database that will store the migrated resources. These settings must be the same as the data store settings of your Wyn installation.
Locate Wyn.conf configuration file in C:\Program Files\Wyn Enterprise\Monitor\conf.
Find the DataExtraction and Storage sections in the file.
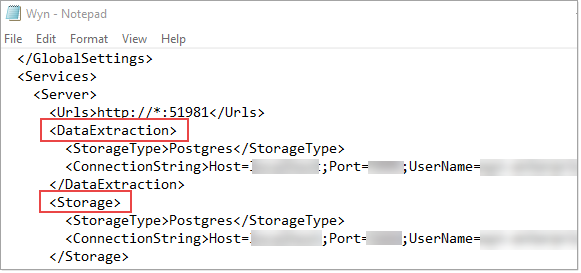
If the settings are encrypted, decrypt them. See the Encrypt or Decrypt Connection Strings article to get more information.
Copy each setting individually, and paste it into the corresponding section in the JSON file as shown below.
"DataExtraction": {
       "StorageType": "",
       "ConnectionString": ""
},

"Storage": {
       "Engine":"",
       "ConnectionString": ""
},
Data extraction settings store the cache database from migrated file data sources such as JSON, XML, and CSV. Storage settings store the server database from the resources.
Configurations like auditing, UI settings, SMTP settings, and others can be moved later. Refer to this article for more information on these configuration settings.
After completing these configuration steps, the appsettings.Production.json file should look something like this -
{
 "ARS": {
       "Url": "http://localhost:8080/",
       "User": "admin",
       "Password": "admin",
       "Timeout": 200000
  },

 "WynServer": {
      "Path": "C:\Program Files\Wyn Enterprise\Server"
  },

 "WynIdentity": {
      "Url": "http://localhost:51980/",
      "UserName": "admin",
      "Password": "admin"
  },

  "DataExtraction": {
       "StorageType": "Postgres",
       "ConnectionString": "Database=wyndatacache;User ID=<username>;Password=<password>;Host=<hostname>;Port=5432;"
  },
 "Storage": {
       "Engine": "Postgres",
       "ConnectionString": "Database=wynserverdata;User ID=<username>;Password=<password>;Host=<hostname>;Port=5432;"
  }
}
Note: Server configurations require a manual restoration due to architectural differences in ActiveReports Server12 and Wyn Enterprise. It is recommended to move essential configurations such as users, roles, and security providers ahead of migration to ensure permissions settings are not lost after migration.
Executing the Migration Tool
Execute the command below in a command prompt or PowerShell window from the folder where the migration script resides.
Prerequisite: .NET Core runtime
Dotnet wyn-ars-migration.dllAfter the migration script is executed, log in to your Wyn Portal and view the migrated resources.
The migration results can be viewed in this location: ./ars-migration/results to identify resources that need a manual restoration or the cause of failure.
Common Migration Issues
Following are some of the known failed issues faced during the migration process.
Issue: Failed migration of data sources or semantic models due to inaccessible data servers/stores.
Solution: Ensure the data servers/stores are accessible to the migration tool, ActiveReports Server, and Wyn Enterprise.
Issue: Failed migration of JSON data source because ActiveReports Server doesn't have "JSON Path" setting for this provider which is required in Wyn.
Solution: Add path-"{$.[*]}"; in the "Description" of the JSON data source on ActiveReports Server.
Note: Since ActiveReports Server production environments contain reports, you should test the migration script on your staging server.