- Getting Started
- Administration Guide
-
User Guide
- An Introduction to Wyn Enterprise
- Document Portal for End Users
- Data Governance and Modeling
- Working with Resources
- Working with Reports
- Working with Dashboards
- View and Manage Documents
- Understanding Wyn Analytical Expressions
- Section 508 Compliance
- Subscribe to RSS Feed for Wyn Builds Site
- Developer Guide
Create a Scheduled Task to Run a Dataset
You can schedule a task on Cached Datasets only. Direct dataset refreshes automatically from the server side while for cached datasets you need to create a scheduled refresh or clean-up task.
To Schedule a Task
Navigate to Resource portal >> Document Types >> Data >> Dataset and follow the below steps to schedule a task on a Dataset:
Select the dataset to schedule a task for. With the dataset selected, click the Info button on the top-right corner of the portal.
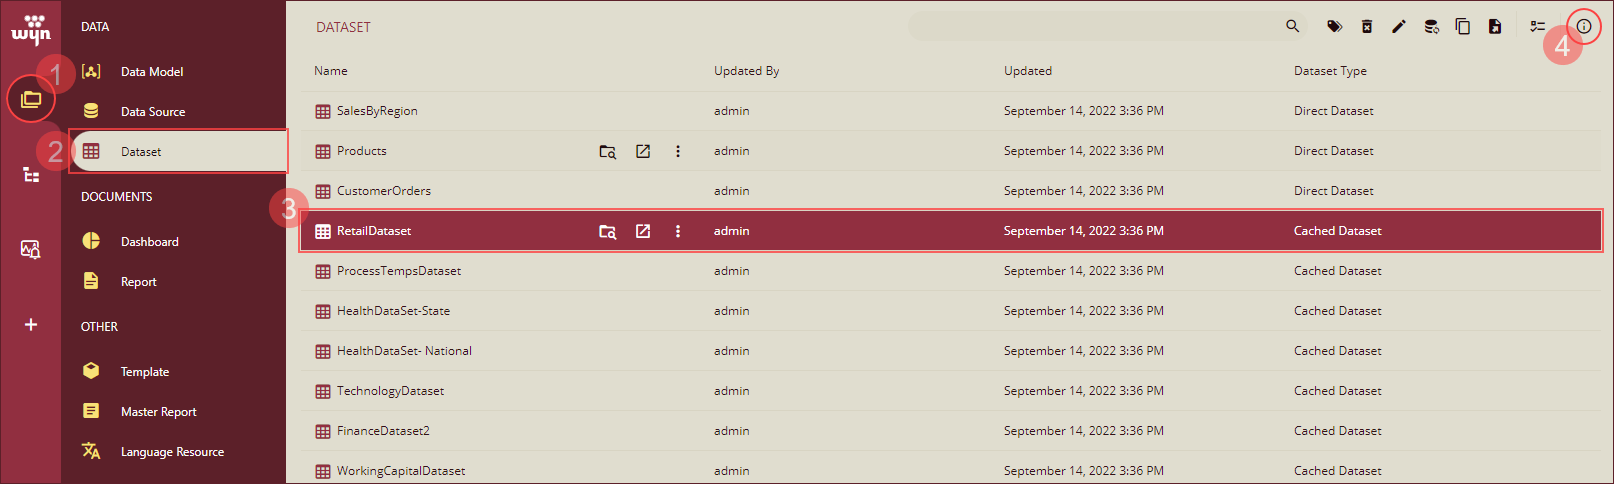
Navigate to the Tasks tab in the Info panel that appears and click the + Add Task button to create a new refresh or clean-up task.

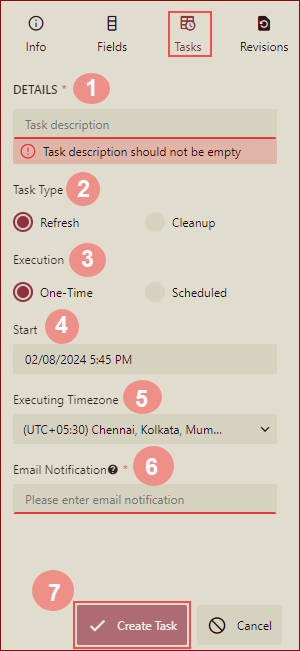
For the Refresh task - Add the following details under the Details section:
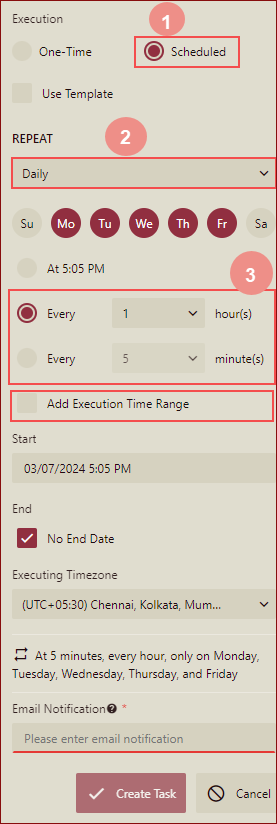
(i) Add a task description, choose the Task Type as Refresh using the radio button, and choose the Scheduled option under Execution.
(ii) To schedule the task using an existing schedule template check the Use Template option and select a template from Choose Template drop-down. Or, to schedule the task without using an existing template enter the schedule details manually.
(iii) Enter the email address to share the task document and click Create Task button to schedule the refresh task.
Note: With the latest Wyn Enterprise release 6.1, the minimum frequency of Every [minute(s)] option is set to 5 minutes by default.

You can specify the Start/End time for a scheduled task by using the Add Execution Time Range option. To select the time range:
Select Daily for REPEAT and select Every hour(s) or Every minute(s) for the execution time.
The Add Execution Time Range check box will appear.
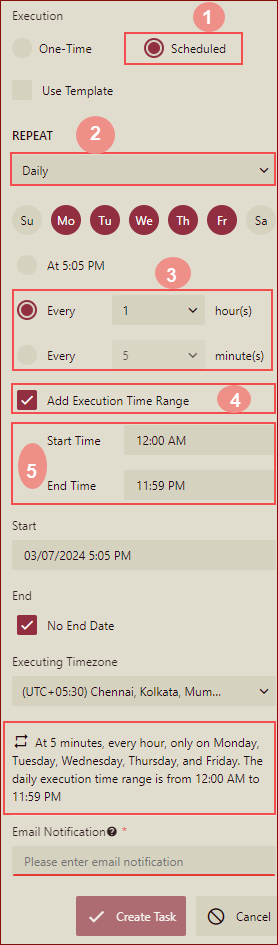
Select Add Execution Time Range, the Start Time and End Time selectors will appear to select the time range during which the task is executed in a day.
The default value of Start Time is "12:00 AM".
The default value of End Time is "11:59 PM"
After adding the execution time range, the description of the execution time range will be displayed in the task description.
There are two ways to modify the Start Time and End Time:
Selection box
Input text
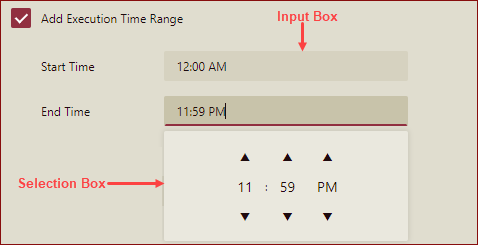
The Start Time and End Time must have a value.
(iv) If you choose the One-Time option under Execution, then you can specify the Start date-time and Executing Timezone as per your requirement. Enter the email address to share the task document and click the Create Task button.
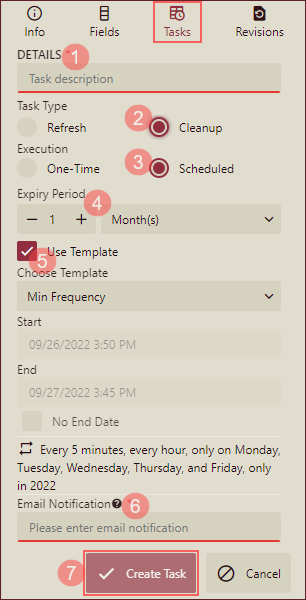
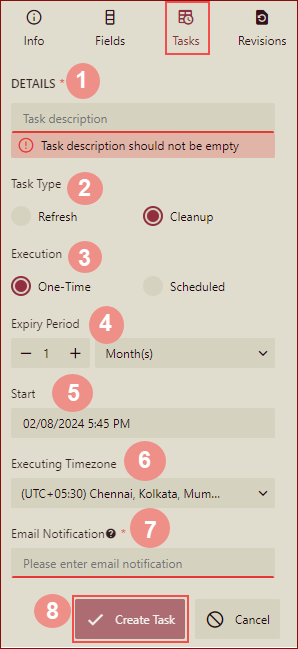
For the Cleanup task- Add the following details under the Details section:
(i) Add a task description, choose the Task Type as Refresh using the radio button, and choose the Scheduled option under Execution. Use the value counter to set an expiry period and select Hour(s), Day(s), Week(s), Month(s), or Year(s) from the drop-down.
(ii) To schedule the task using an existing schedule template check the Use Template option and select a template from Choose Template drop-down. Or, to schedule the task without using an existing template enter the schedule details manually.
(iii) Enter the email address to share the task document and click Create Task button to schedule the clean-up task.
(iv) If you choose the One-Time option under Execution, then you can specify the Expiry Period, Start date-time, and Executing Timezone as per your requirement. Enter the email address to share the task document and click the Create Task button.
Note: For successful task execution, ensure that the worker service is running in the background, or else the scheduled task will fail to execute. To get the status of the worker service, navigate to the Node Management page on the Admin Portal.
To Manage a Scheduled Task
To manage a scheduled task, click the Ellipsis button  in the Tasks tab. You can use this button to disable, edit, or delete a scheduled task.
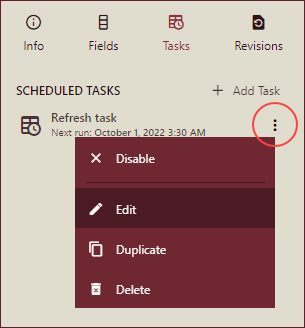
Disable - Deactivates all future scheduled executions for that task. You can resume the task execution once you enable the scheduled task by clicking the Ellipses button.
Edit - Enables you to modify the existing information for that task like its name, execution type, timings, export format, and so on.
Duplicate - Creates a new task with all the settings as defined in the originally scheduled task. This way, you can reuse the settings and save time and effort in re-creating a scheduled task from scratch.