- Getting Started
- Administration Guide
-
User Guide
- An Introduction to Wyn Enterprise
- Document Portal for End Users
- Data Governance and Modeling
- Working with Resources
- Working with Reports
- Working with Dashboards
- View and Manage Documents
- Understanding Wyn Analytical Expressions
- Section 508 Compliance
- Subscribe to RSS Feed for Wyn Builds Site
- Developer Guide
Create a Scheduled Task to Run a Dashboard
Once you create a scheduled task in Wyn Enterprise, the run result of the dashboard is automatically generated at the specified time or interval. You can share the result to the designated email address in the form of a link.
In Wyn Enterprise, a scheduled task can be set to manual, one-time, or scheduled depending on your requirements. For each execution mode, there is a different set of fields that should be specified for a scheduled task to run successfully. For more details, please have a look at the below sections.
To Schedule a Task
Follow the below steps to schedule a task for a dashboard.
Note: For successful task execution, make sure that the dashboard worker service is running in the background, else the scheduled task will fail to execute. To get the status of the dashboard worker service, navigate to the Node Management page on the Admin Portal.
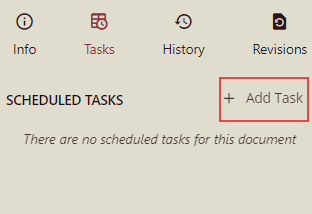
On the Document Portal, select the dashboard you want to schedule.
With the dashboard selected, click the Info button on the top-right corner of the portal.
In the Info panel that appears, navigate to the Tasks tab and click the + Add Task button to create a new scheduled task.
Add Task dialog is displayed.
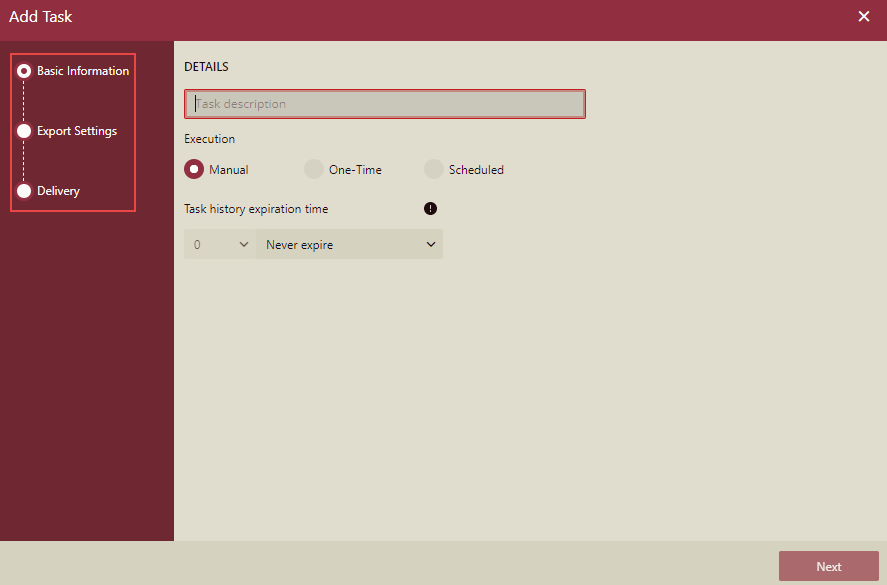
In the Basic Information, enter the following details:
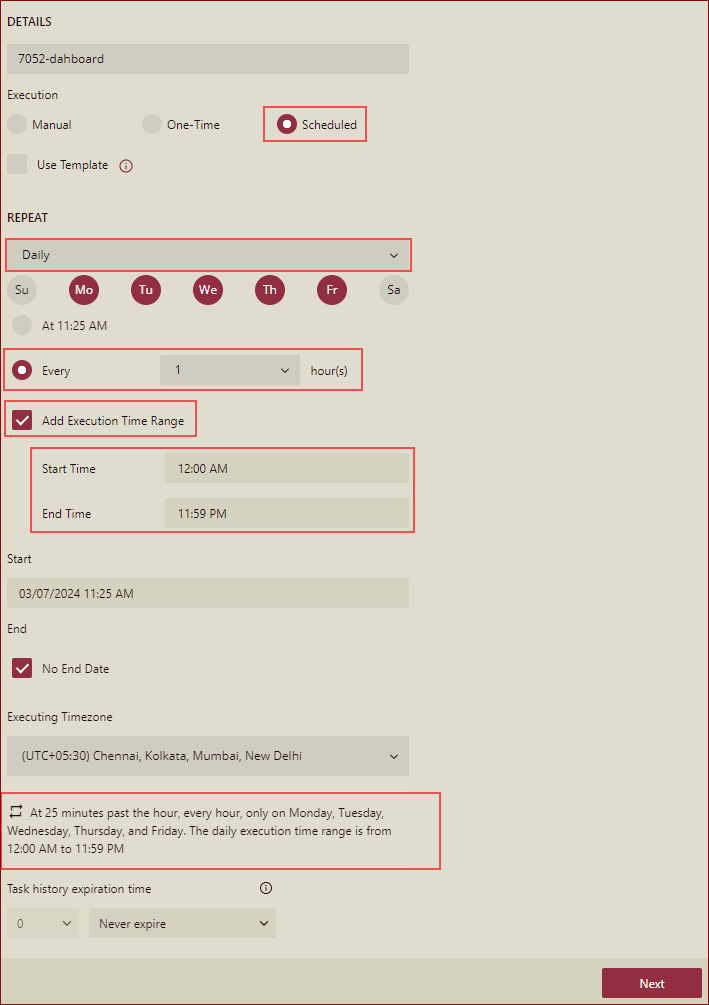
Enter the task description in the DETAILS field.
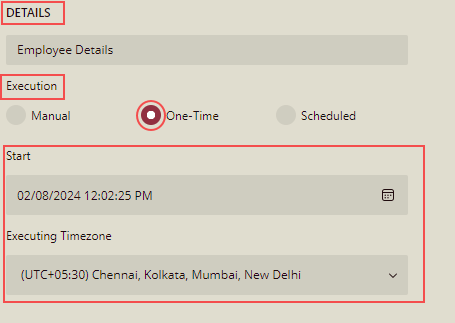
By default, tasks are manually scheduled in Wyn Enterprise. If the Execution field is set to One-Time, then you can specify the Start date-time and Executing Timezone as per your requirement.
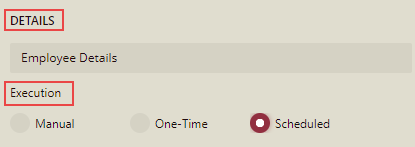
To create a task that runs at fixed intervals of time, set the Execution field to 'Scheduled'.
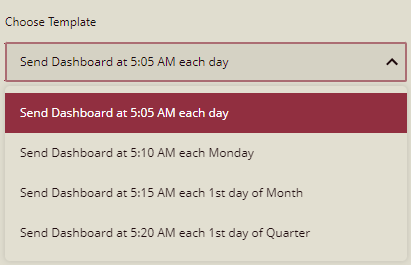
From the Choose Template dropdown, select a suitable schedule template that matches your requirements. The list shows both the built-in and custom templates on the server. For more information on how to create a custom schedule template, visit this article.
The Start and the End fields pick the default values specified in the chosen schedule template. These default values are unchangeable.
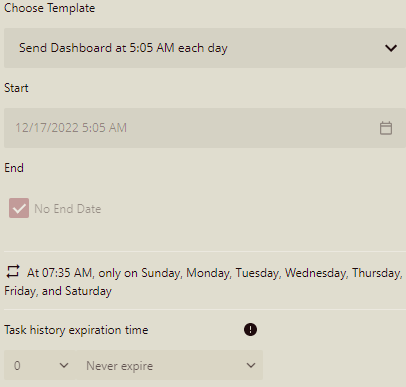
Note: If the chosen template has predefined settings for the email delivery, then its corresponding fields like Email To, Reply To, Subject, and Body are set to default values as specified in the template, and hence can't be modified.
You can specify the Start/End time for a scheduled task by using the Add Execution Time Range option. To select the time range:
Select Daily for REPEAT and select Every hour(s) for the execution time.
The Add Execution Time Range check box will appear.
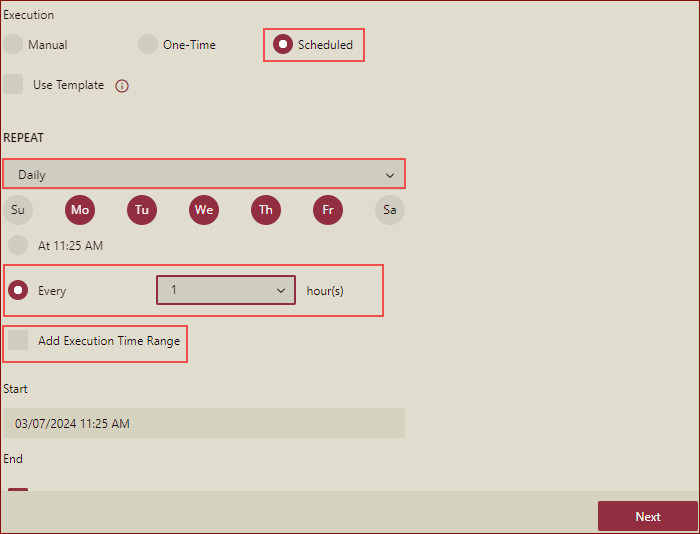
Select Add Execution Time Range, the Start Time and End Time selectors will appear to select the time range during which the task is executed in a day.
The default value of Start Time is "12:00 AM".
The default value of End Time is "11:59 PM"
After adding the execution time range, the description of the execution time range will be displayed in the task description.
There are two ways to modify the Start Time and End Time:
Selection box
Input text
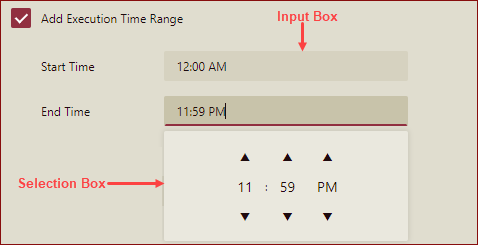
The Start Time and End Time must have a value.
Click the Next button.
Here you need to add the Export Settings.
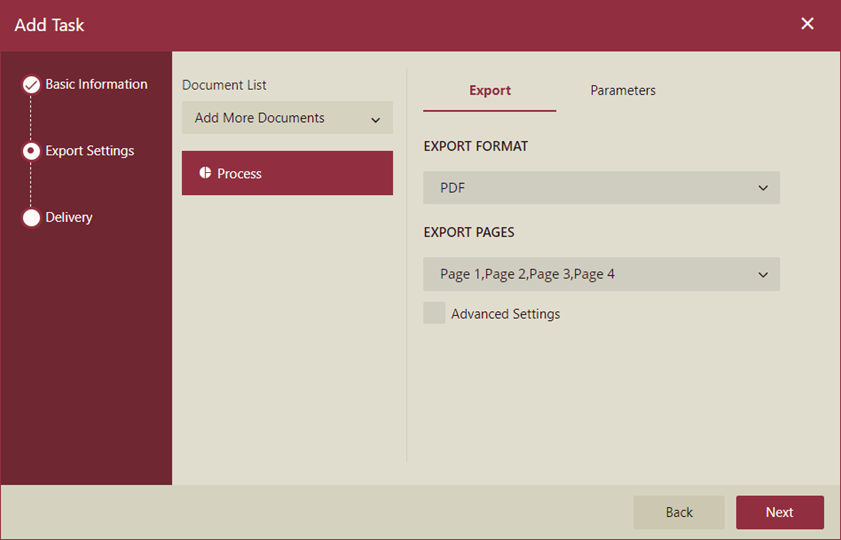
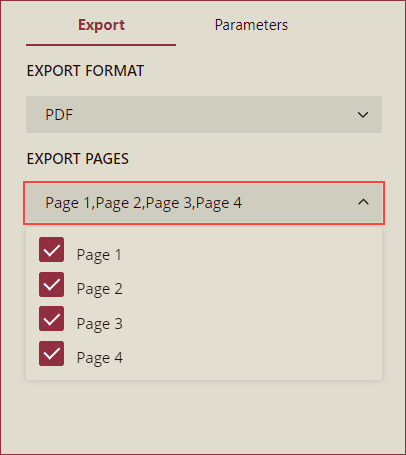
In the EXPORT FORMAT dropdown, the option PDF is selected by default. Dashboards can be exported in the PDF format only. From the Export Pages dropdown, select or deselect the pages you wish to export using the checkbox next to the page number.
Note: These PDFs can be rendered using the following browsers: Chrome, Firefox, and Edge. Refer section Setting up Browser for PDF Export for details.
You can check the Advanced Settings option to specify the advanced export properties for the chosen format.
In case your dashboard contains any parameter(s), you need to enter valid parameter value(s) or set the value(s) to default. Else, a message saying 'Invalid Parameters' will be displayed.
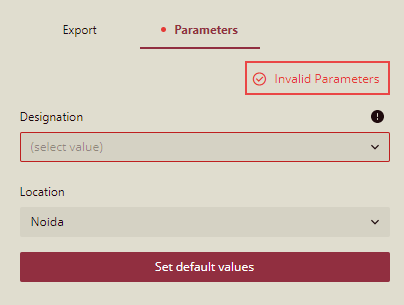
If your dashboard has no parameters, then a message 'Dashboard has no parameters' will be displayed.
Enter the parameters and click the Next button.

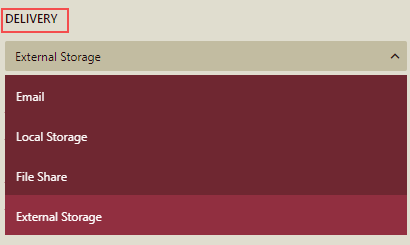
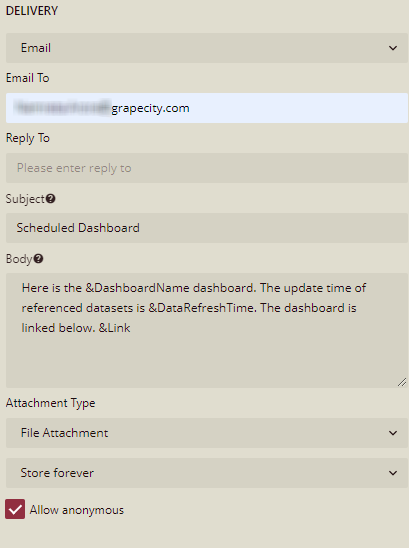
If the delivery method is not specified in the schedule template, then specify the delivery option from the DELIVERY dropdown list.
If you choose 'Email' as the delivery method, then specify the recipient email address in Email To, the Reply-To email address, the subject line, and the body message for the email.
Note: Use comma(s) to separate multiple email addresses.
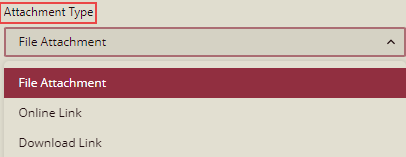
You can also control how to share the result on the email by either sending it as a file attachment or providing a link in the email body to download the result.
Once the information is specified, the Delivery details will be displayed as below:
Please note, if the Administrator has set the Hide Attachment Type Options for Email Delivery Tasks property to True in the Admin portal, then while creating the scheduled task the Attachment Type options for delivery type as Email will not be displayed and it will use the default Attachment Type value. The default Attachment Type values are as below:
When not using Schedule Template: The default Attachment Type is Online Link and for the Multiple Doc (Doc Binder) also, the default Attachment Type is File Attachment.
Setting up Browser for PDF Export
Two new setting nodes BrowserForExport and BrowserPathForExport are added in the DashboardWorker node of the wyn.config file. Details for both the setting nodes are as below:
Property | Description |
|---|---|
BrowserForExport | This represents the browser type. Available values are "chrome" and "firefox". For Edge you should use the value as "chrome" only. |
BrowserPathForExport | This represents the browser executable file path. Example:
|
Note: These 2 settings are priority over the old setting: ChromeExecutablePath.
Sample Code
BrowserForExport and BrowserPathForExport for Chrome
<?xml version="1.0" encoding="utf-8"?>
<SystemConfig xmlns:sys="https://extendedxmlserializer.github.io/system" xmlns="clr-namespace:ConfigMigration.Configuration.V60;assembly=ConfigMigration">
  <Services>
    <CotWorker />
    <DashboardWorker>
       <BrowserForExport>chrome</BrowserForExport>
       <BrowserPathForExport>C:\\Program Files\\Google\Chrome\\Application\\chrome.exe</BrowserPathForExport>
    </DashboardWoker>
    <AnalysisDBService />
  </Services>
</SystemConfig>
BrowserForExport and BrowserPathForExport for Edge
<?xml version="1.0" encoding="utf-8"?>
<SystemConfig xmlns:sys="https://extendedxmlserializer.github.io/system" xmlns="clr-namespace:ConfigMigration.Configuration.V60;assembly=ConfigMigration">
  <Services>
    <CotWorker />
    <DashboardWorker>
       <BrowserForExport>chrome</BrowserForExport>
       <BrowserPathForExport>C:\\Program Files (x86)\\Microsoft\\Edge Dev\\Application\\msedge.exe</BrowserPathForExport>
    </DashboardWoker>
    <AnalysisDBService />
  </Services>
</SystemConfig>
BrowserForExport and BrowserPathForExport for Firefox
<?xml version="1.0" encoding="utf-8"?>
<SystemConfig xmlns:sys="https://extendedxmlserializer.github.io/system" xmlns="clr-namespace:ConfigMigration.Configuration.V60;assembly=ConfigMigration">
  <Services>
    <CotWorker />
    <DashboardWorker>
       <BrowserForExport>firefox</BrowserForExport>
       <BrowserPathForExport>C:\\Program Files\\Firefox Developer Edition\\firefox.exe</BrowserPathForExport>
    </DashboardWoker>
    <AnalysisDBService />
  </Services>
</SystemConfig>
Note : For the Edge browser, you need to update the WynService's permission to the administrator.
To Manage a Scheduled Task
To manage a scheduled task, click the Actions button  in the Tasks tab. You can use this button to disable, edit, duplicate, or delete a scheduled task.
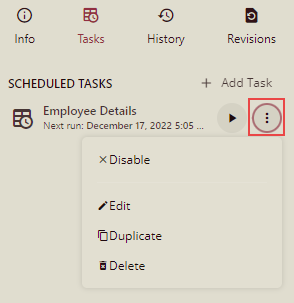
Disable - Deactivates all the future scheduled executions for that task. You can resume the task execution once you enable the scheduled task by clicking the Actions button.
Edit - Enables you to modify the existing information for that task like its name, execution type, timings, export format, and so on.
Duplicate - Creates a new task with all the settings defined the same as in the originally scheduled task. This way, you can reuse the settings and save your time and effort in re-creating a scheduled task from scratch.
Delete - Discards the scheduled task. Note that once you delete a scheduled task, it is gone forever.
Task Execution Modes
The below section describes the fields available for the different task execution modes supported in Wyn Enterprise - manual, one-time, and scheduled.
Note: MS Teams does not support deployment on public network due to multi-factor authentication. However, you can use email to send notifications to channels.
Manual Task Execution Mode
For the manual execution mode, you need to specify the following fields in the Info panel.
Property | Description |
|---|---|
Details | Enter a description for the task. |
Execution | Choose the execution mode for the task. In this case, set it to 'Manual'. |
Parameters | Input valid parameter value(s) for the dashboard if any. |
Delivery | Select the delivery method for sharing the report result. The supported delivery methods are email, local storage, file share, external storage, and application message. • Email - Specify the recipient's email address, the reply-to email address where the recipient can respond, the subject line, and the body message for the email. You can also control how to share the result on the email by either sending it as a file attachment or providing a link in the email body to download the result. If the export format for the report is set to 'Image' or 'HTML', you can also insert the result into the email body. • Local Storage - In this method, the result is stored on the system server permanently, until a specific date, or once the defined period expires. • File Share - Input the file name and shared location for the result. You can check the Overwrite Existing option to replace the previous report result with the latest one. If you set the delivery method to 'Email' or 'Local Storage', you can choose whether to give access to any user (including non-Wyn Enterprise users) for viewing or downloading the report result through the Allow Anonymous option. • External Storage - In this method, you can select the storage type and name of the storage to send the result to a target location. This method is only available to the users for whom the admin user has enabled the permissions on the Admin Portal. • Application Message - In this method, the result is shared by sending a message notification to Slack or MS Teams application. Enter the message details including the subject, body, and recipients (channels or users) into the respective fields. Specify how to share the result in the application message, as an attachment link or a download link. This method is only available if the admin user has enabled the notifications on the Admin Portal for either Slack or MS Teams, or both. |
One-Time Task Execution Mode
For the one-time execution mode, you need to specify the following fields in the Info panel.
Property | Description |
|---|---|
Details | Enter a description for the task. |
Execution | Choose the execution mode for the task. In this case, set it to 'One-Time'. |
Start | Set the start date and time for the task. The start time can't be set to any time less than 5 minutes from the current time. |
Parameters | Input valid parameter value(s) for the dashboard if any. |
Delivery | Select the delivery method for sharing the report result. The supported delivery methods are email, local storage, file share, external storage, and application message. • Email - Specify the recipient's email address, the reply-to email address where the recipient can respond, the subject line, and the body message for the email. You can also control how to share the result on the email by either sending it as a file attachment or providing a link in the email body to download the result. If the export format for the report is set to 'Image' or 'HTML', you can also insert the result into the email body. • Local Storage - In this method, the result is stored on the system server permanently, until a specific date, or once the defined period expires. • File Share - Input the file name and shared location for the result. You can check the Overwrite Existing option to replace the previous report result with the latest one. If you set the delivery method to 'Email' or 'Local Storage', you can choose whether to give access to any user (including non-Wyn Enterprise users) for viewing or downloading the report result through the Allow Anonymous option. • External Storage - In this method, you can select the storage type and name of the storage to send the result to a target location. This method is only available to the users for whom the admin user has enabled the permissions on the Admin Portal. •Application Message - In this method, the result is shared by sending a message notification to Slack or MS Teams application. Enter the message details including the subject, body, and recipients (channels or users) into the respective fields. Specify how to share the result in the application message, as an attachment link or a download link. This method is only available if the admin user has enabled the notifications on the Admin Portal for either Slack or MS Teams, or both. |
Scheduled Task Execution Mode
For the scheduled execution mode, you need to specify the following fields in the Info panel.
Property | Description |
|---|---|
Details | Enter a description for the task. |
Execution | Choose the execution mode for the task. In this case, set it to 'Scheduled'. |
Choose Template | Select a schedule template for the task. A schedule template is used to define the recurring interval at which to run a dashboard and the email delivery details. See this article for more information on schedule templates. |
Parameters | Input valid parameter value(s) for the dashboard if any. |
Delivery | Specify the recipient's email address, the reply-to email address where the recipient can respond, the subject line, and the body message for the email. |