- Getting Started
- Administration Guide
-
User Guide
- An Introduction to Wyn Enterprise
- Document Portal for End Users
-
Data Governance and Modeling
- Data Binding Concepts
-
Introduction to Data Sources
- Connect to Oracle
- Connect to SQL Server
- Connect to MySQL
- Connect to Postgres
- Connect to Snowflake
- Connect to SQLite
- Connect to DM
- Connect to TiDB
- Connect to AnalyticDB(MySQL)
- Connect to GreenPlum
- Connect to TimeScale
- Connect to Amazon Redshift
- Connect to MariaDB
- Connect to ClickHouseV2
- Connect to MonetDB
- Connect to Kingbase
- Connect to GBase8a
- Connect to GBase8s
- Connect to ClickHouse
- Connect to IBM DB2
- Connect to IBM DB2 iSeries/AS400
- Connect to Google BigQuery
- Connect to Hive (beta)
- Connect to ElasticSearch (beta)
- Connect to Hana
- Connect to Excel
-
Connect to JSON
- Connect to CSV
- Connect to XML
- Connect to MongoDB
- Connect to ElasticSearchDSL
- Connect to InfluxDB
- Connect to SSAS
- Connect to ODBC
- Connect to OData
- Connect to TDengine
- Connect to Teradata
- Introduction to Data Model
- Introduction to Direct Query Model
- Introduction to Cached Model
- Introduction to Datasets
- How To
- Secure Data Management
- Working with Resources
- Working with Reports
- Working with Dashboards
- View and Manage Documents
- Understanding Wyn Analytical Expressions
- Section 508 Compliance
- Subscribe to RSS Feed for Wyn Builds Site
- Developer Guide
Connect to JSON
To create a JSON data source in Wyn Enterprise, follow these steps.
On the Resource Portal, navigate to Create (+) > Create Data Source.
Select Json in the data source list on the left or in the icon view on the right.
Fill in the database configuration information for the selected data source.
Field | Description |
|---|---|
Name* | The name for the data source that you want to specify. |
SourceType | Select from the list that displays the following options - Local, Web, Embed, and File System. |
Data Source* | If the source type is Local, click Select File to select the local source file. If the source type is Web, you need to enter the address of the source, which is usually a URL. For example, https://yourdomain.com/api/values/json.json If the source type is Embed, you need to enter or paste the content of the JSON file. If the source type is File System, you need to enter the path to the file location. For more information on data sources, please see the Supported Data Sources section. |
Authentication Method | If the source type is Web, you need to set the authentication mode. You can choose from None, Basic and OAuth2. If the AuthMode is Basic, you need to set the user name and password. If the AuthMode is OAuth2, you need to set GrantType, Token Endpoint, Client Id, Client Secret, UserName, Password, and Scope. |
Pre-Query: JSON path* | To query the JSON data, you can either select JSON Path or SQL Statement with Json function. JSON Path is used to parse the JSON data structure and extract the JSON Path expression of the specified data set, such as For the syntax of JSON path, see https://goessner.net/articles/JsonPath/. |
* Required fields
Click Next. You will have the data source structure, where you can adjust the preview column width by dragging the column width adjustment symbol.
Click Create after the successful connection.
You can view the added data source in the Categories tab of the Resource Portal.
Note:
• If garbled characters appear when a local JSON file is used, save the file in the UTF-8 encoding and upload it again.
• Also, if a column with the same name is detected, only the column that appears first is retained, whereas the data from the column with the same name is discarded.
Supported Data Sources
The Source Type field specifies the type of JSON data source you want to use, which includes - Local, Web, Embed, and File System. You can refer to the following sections for more details.
Local
Specify the file on your local system that contains the JSON data.
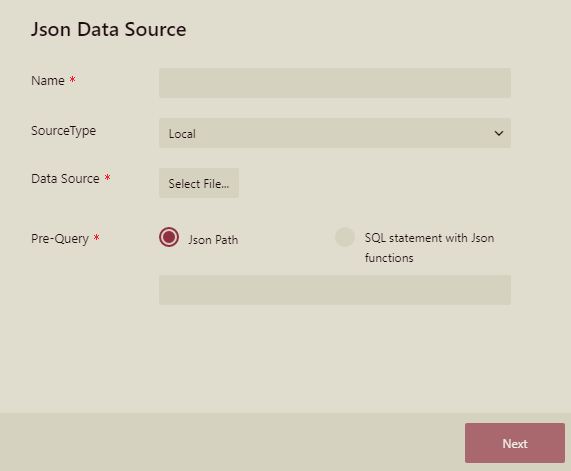
If you set the Source Type to Local, enter the following configuration details.
Name: Specify the name for the data source.
Source Type: Set the data source type to Local.
Data Source: Click the Select File button to load the JSON file from your local system.
Pre Query: To query the JSON data, you can either select JSON Path or SQL Statement with Json function. JSON Path is used to parse the JSON data structure and extract the JSON Path expression of the specified data set, such as
$.bookstore.books[*]. SQL Statement with Json function uses the JSON function to preprocess the JSON data, which can parse the string cells of the data row and connect with other tables.
Web
Specify a URL for the JSON file, for example https://yourdomain.com/api/values/json.json. You can add multiple endpoints belonging to the same base address.
If you set the Source Type of the JSON data source to Web, the configuration page displays two panels - Global Configuration panel on the left and Endpoint Configuration panel on the right.
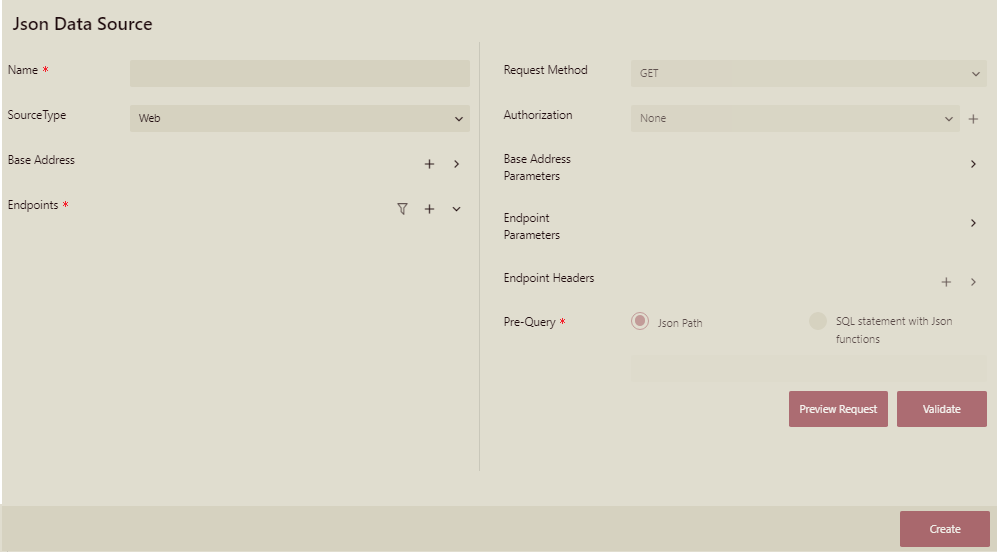
Global Configuration
In the Global Configuration panel, you can set the following options.
Name: Specify the name for the data source.
Source Type: Set the data source type to Web.
Base Address: Enter the base URL for the JSON data. Use the + button to add the base address for the JSON data and then fill the details in the Add Base Address dialog box. You can add multiple base URLs in a single JSON data source.
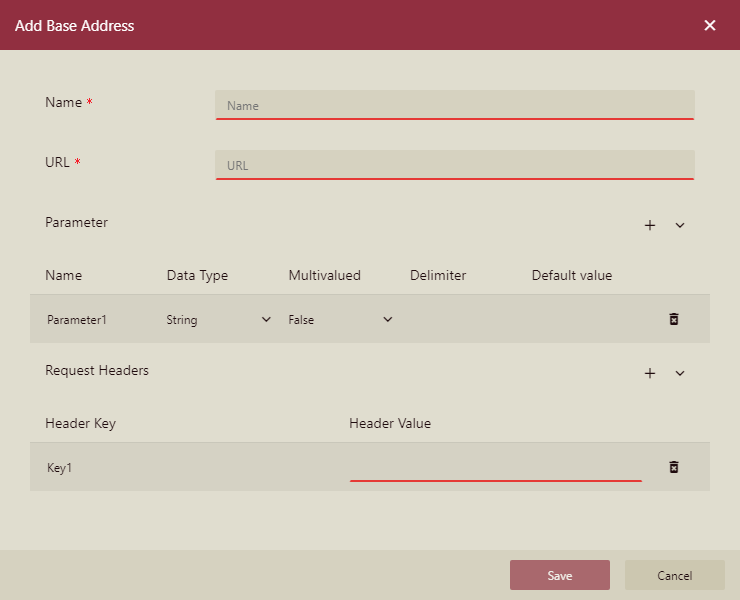
The Add Base Address dialog box provides the following options.
Name: Specify a unique name for the base address.
URL: Enter the URL for the source data.
Parameters: Define the data source parameters shared by the endpoints that reference the same base address. Specify the Name, Data Type, MultiValued, Delimiter, and Default Value for the parameter. The delimiter defines the character used to separate the multi-valued parameter values in the URL query string. If the delimiter value is empty, use the key-value pairs and character '&' for the parameter values.
The parameter names in different base addresses can have the same name.
Request Headers: Contains information related to authorization. You can set the HTTP header fields that are passed along the request, which are Header Key and Header Value.
EndPoint: Endpoint refers to the resource path of the base address. You can add multiple endpoints belonging to the same base address.
Click the + button to add an endpoint for the base address. An Add EndPoint dialog box will appear as shown.
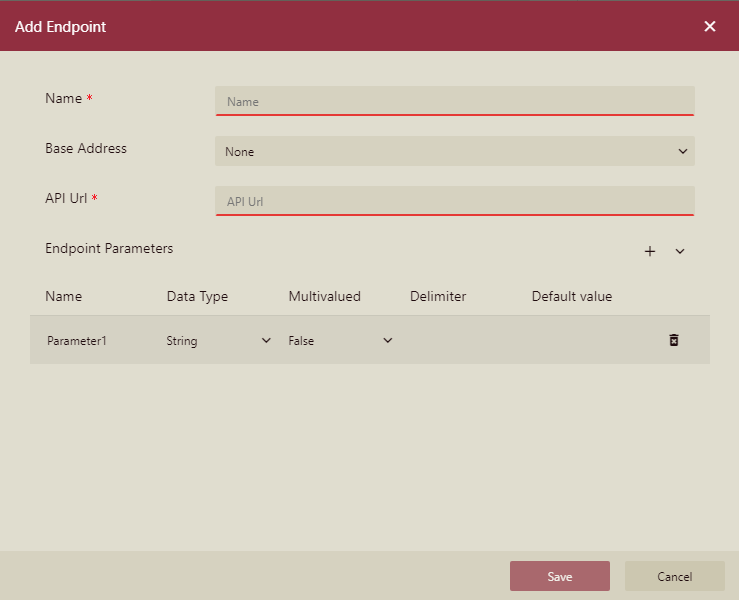
You can set the following options in the Add EndPoint dialog box.
Note: You cannot add endpoints and multi-valued parameters with different base addresses to a single data source.
Name: Specify a unique name for the endpoint.
Base Address: Select the base address from the drop-down. If you do not want to use the configured base address, then select None from the drop-down.
API URL: Enter the endpoint address. If the Base Address is set to None, enter an absolute URL.
Endpoint Parameters: Define the data source parameters for the endpoint. The parameters are endpoint-specific. Specify the Name, Data Type, MultiValued, Delimiter, and Default Value for the endpoint parameter. The delimiter defines the character used to separate the multi-valued parameter values in the URL query string. In case the delimiter value is empty, use the key-value pairs and character '&' for the parameter values.
Once you specify the options in the Add EndPoint dialog box, you will observe that the added endpoint is invalidated. In order to validate the endpoint, you need to perform a detailed configuration of each endpoint in the Endpoint Configuration panel, as explained below.
Endpoint Configuration
In the Endpoint Configuration panel, you can set the following options.
Request Method: Specify the HTTP request method. It can either be set to GET (included in URL) or POST (included in Request Body). POST requests allow defining a body as an expression to obtain data.
Authentication Mode: Specify the authorization mode for the endpoint. You can set it to None, or click the + button next to the drop-down to add an authorization mode. An Add Authorization dialog box will appear as shown below.
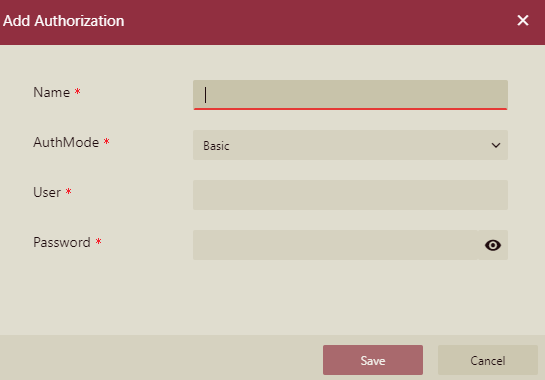
You can specify the following options in the Add Authorization dialog box.
Name: Enter the name for the authentication or authorization item.
AuthMode: Select the authentication mode as Basic or OAuth2. If you select the Basic authentication mode, you need to specify the User and Password details. In case you select the OAuth2 authentication mode, you need to specify the GrantType, Token Endpoint, Client Id, Client Secret, UserName, Password, and Scope details.
Base Address Parameters: Displays the data source parameters defined for the base address. These parameters cannot be edited.
Endpoint Parameters: Displays the data source parameters defined for the base address. You can also add new endpoint parameters by clicking the + button.
Endpoint Headers: Contains information related to authorization. You can set the HTTP header fields that are passed along the request, which are Header Key and Header Value.
Payload: Body for the POST request method. This option is enabled only when the HTTP Method is set to POST.
Pre Query: To query the JSON data, you can either select JSON Path or SQL Statement with Json function. JSON Path is used to parse the JSON data structure and extract the JSON Path expression of the specified data set, such as
$.bookstore.books[*]. SQL Statement with Json function uses the JSON function to preprocess the JSON data, which can parse the string cells of the data row and connect with other tables.
Click the Preview Request button to display the configuration details for the endpoint including the request method, request URL, request headers, and request body (if any). Proceed further by clicking the Validate button.
Embed
Specify the string that contains the JSON data.
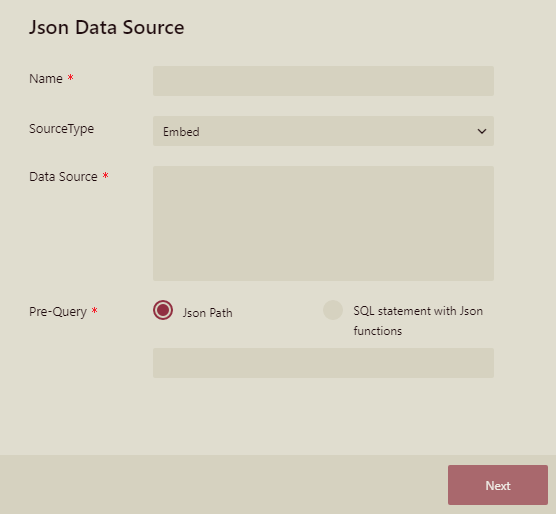
If you set the Source Type to Embed, enter the following configuration details.
Name: Input the name of the custom data source.
Source Type: Set the data source type to Embed.
Data Source: Input or paste the content of the JSON file.
Pre Query: To query the JSON data, you can either select JSON Path or SQL Statement with Json function. JSON Path is used to parse the JSON data structure and extract the JSON Path expression of the specified data set, such as
$.bookstore.books[*]. SQL Statement with Json function uses the JSON function to preprocess the JSON data, which can parse the string cells of the data row and connect with other tables.
File System
Specify the path for the JSON file.
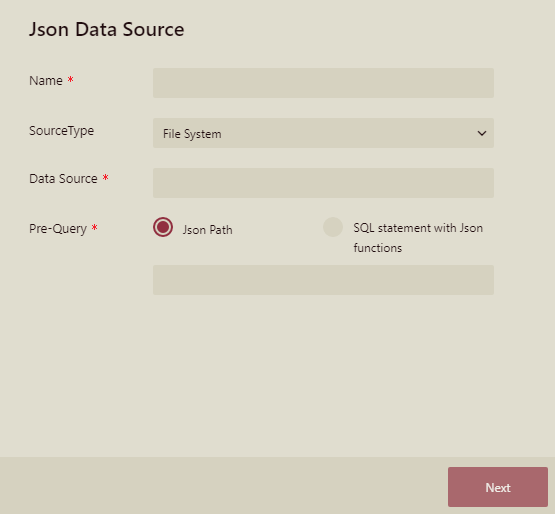
If you set the Source Type to File System, enter the following configuration details.
Name: Specify the name for the data source.
Source Type: Set the data source type to File System.
Data Source: Enter the path where the JSON file is kept on your local system.
Pre Query: To query the JSON data, you can either select JSON Path or SQL Statement with Json function. JSON Path is used to parse the JSON data structure and extract the JSON Path expression of the specified data set, such as
$.bookstore.books[*]. SQL Statement with Json function uses the JSON function to preprocess the JSON data, which can parse the string cells of the data row and connect with other tables.