- Getting Started
-
Administration Guide
-
Get Started with Administering Wyn Enterprise
- System Requirements
- Installing on Windows
- Installing on Linux
- Installing using Docker
- License Wyn Enterprise
- Deploying with HTTPS
- Deploying with Reverse Proxy
- Deploying to Azure App Service (AAS)
- Deploying to Azure Kubernetes Service (AKS)
- Deploying to AKS using Helm Chart
- Deploying to Local Kubernetes
- Deploying to Kubernetes Cluster using Helm Chart
- Deploying as a Virtual Directory or Sub-Application
- Deploying to Amazon ECS
- Deploying to Amazon EKS using Helm Charts
- Deploying in a Distributed Environment
- Migration from ActiveReports Server 12
- Upgrade Wyn Enterprise to Latest Version
- Logging on to the Administrator Portal
- Ports in Firewall
- Configuration Settings
- Account Management
- Security Management
- System Management
- Document Management
- How To and Troubleshooting
-
Get Started with Administering Wyn Enterprise
- User Guide
- Developer Guide
Deploy Servers
Wyn Enterprise supports multi-server deployment that helps to balance the workload distribution among two or more machines. With multi-server deployment, you can significantly reduce the burden on each machine and enhance their work efficiency.
Note: The servers in a distributed deployment environment use the same data store.
In this section, you will learn how to deploy multiple servers in Wyn Enterprise remotely.
Before You Begin
Ensure that the following software prerequisites are installed on any accessible machine before deploying the servers,
Redis version 5.0 or newer
Ensure to update the binding IP address in Redis.windows.conf and Redis.windows-service.conf files to the IP address of the machine where Redis is installed.
Nginx, used for load balancing.
Updating Configuration File on Primary Node
To enable multi-server deployment on the primary node:
Go to C:⧵Program Files⧵Wyn Enterprise⧵Monitor⧵conf, and open the Wyn.conf file.
Add this section under the Server element of the file to deploy multiple servers in your environment.
Here, the ConfigString denotes the connection string for Redis.
<EnableMultipleServers>true</EnableMultipleServers>
  <Cache>
    <DistributedMemoryCache>
     <ConfigString>Server=address:port_number,Expire=0,Db=0,ThrowOnFailure=true,Timeout=3000</ConfigString>
    </DistributedMemoryCache>
  </Cache>
Replace localhost or 127.0.0.1 with the IP address of the primary node machine throughout the configuration file.
Save the changes, and close the file.
Installing Server Module on Secondary Node
To install Server module using Node Management on the primary node machine:
Open the Wyn Enterprise portal, i.e., http://localhost:51980/admin on the web browser.
Switch to the Admin Portal and navigate to the Node Management page.
From the Nodes tab, choose a node where you want to install the Server module except the primary node.
Under the Service Information section of the node, click the Download icon to install the Server module.
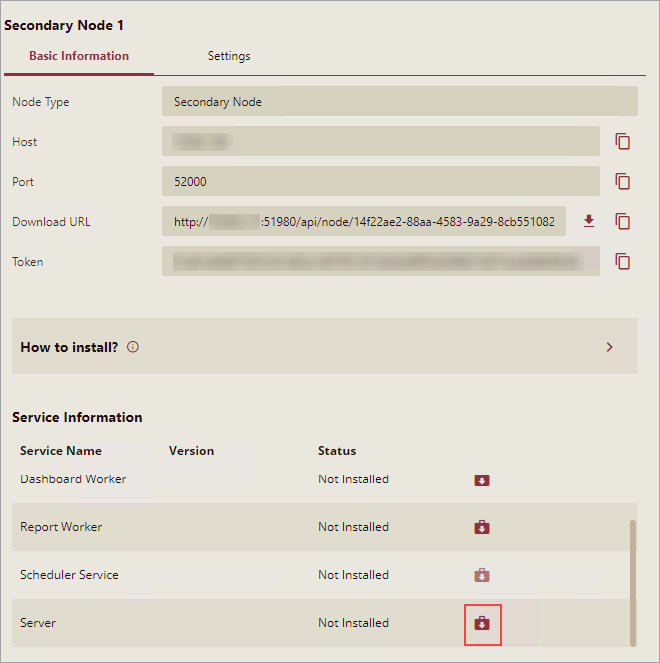
Once the Server module is installed successfully on the machine, its Status changes from Not Installed to Running.
Save the changes.
Tip: To install multiple servers, please repeat the steps from 3 to 5.
Please Note: You can create multi-server licenses in trial and evaluation licenses as well and thus use the K8s to test load balancing and active-active implementations. The licenses that allow multiple servers cannot be activated successfully in Wyn with a non-distributed environment.
Setting up Nginx Load Balancer
To configure Nginx as the load balancer:
Go to the Nginx directory and open the Nginx.conf file.
Add this section in the configuration file to balance the workload among multiple servers.
Over here, the upstream servers represent the IP address of the machines on which the Server modules are installed.
        map $http_upgrade $connection_upgrade {
        default upgrade;
        ''      close;
    }

    upstream wyn {
        server 10.32.6.8:51980 max_fails=3 fail_timeout=15s;
        server 10.32.5.250:51980 max_fails=3 fail_timeout=15s;
    }

    server {
        listen  8089;
        location / {
            add_header backendIP $upstream_addr;
            add_header backendCode $upstream_status;
            proxy_pass http://wyn;
            # support websocket
            proxy_set_header Upgrade $http_upgrade;
            proxy_set_header Connection $connection_upgrade;
            proxy_set_header Host $host:$server_port;
            proxy_connect_timeout       300s;
            proxy_send_timeout          300s;
            proxy_read_timeout          300s;
            send_timeout                300s;
            sendfile on;
            proxy_buffer_size 64k;
            proxy_buffers   32 32k;
            proxy_busy_buffers_size 128k;
            fastcgi_buffers 8 16k;
            fastcgi_buffer_size 32k;
            client_max_body_size 100M;
        }
    }
Save the changes and close the configuration file.
Modifying Global Settings on Primary Node
To set the global settings for the primary node:
On the Admin Portal of Wyn Enterprise, navigate to System Management > Node Management page.
In the Global Settings tab, set the Identity Server URL to http://<Nginx IP Address>:<Listening Port>.
The Nginx IP address is the IP address of the machine where Nginx is installed.
Click the Save button.
Save Settings dialog box will appear on your screen, click the Yes button to save changes.
Note: The Wyn Enterprise service will restart on making the above changes, which may take upto 1-3 minutes.
Restarting Primary and Secondary Nodes
To restart primary and secondary node machines, go to the Start menu, and click Power > Restart.
After both the machines restart, you can visit the Wyn Enterprise portal, i.e., http://<Nginx IP Address>:<Listening Port> on the primary node machine.
If you face any issues, please try to re-login using http://<Nginx IP Address>:<Listening Port>/logout page.