- Getting Started
-
Administration Guide
-
Get Started with Administering Wyn Enterprise
- System Requirements
- Installing on Windows
- Installing on Linux
- Installing using Docker
- License Wyn Enterprise
- Deploying with HTTPS
- Deploying with Reverse Proxy
- Deploying to Azure App Service (AAS)
- Deploying to Azure Kubernetes Service (AKS)
- Deploying to AKS using Helm Chart
- Deploying to Local Kubernetes
- Deploying to Kubernetes Cluster using Helm Chart
- Deploying as a Virtual Directory or Sub-Application
- Deploying to Amazon ECS
- Deploying to Amazon EKS using Helm Charts
- Deploying in a Distributed Environment
- Migration from ActiveReports Server 12
- Upgrade Wyn Enterprise to Latest Version
- Logging on to the Administrator Portal
- Ports in Firewall
- Configuration Settings
- Account Management
- Security Management
- System Management
- Document Management
- How To and Troubleshooting
-
Get Started with Administering Wyn Enterprise
- User Guide
- Developer Guide
Wyn Enterprise: Deploying in a Distributed Windows Environment
This section explains how to set up Wyn Enterprise in a distributed environment for Windows, which you can accomplish by deploying servers, services, and worker modules on separate machines.
Caution: Make sure to deploy the services before the worker modules in a distributed deployment environment.
Note: Please contact Wyn Enterprise Sales for a distributed license key.
Before You Begin
Before you start with the deployment procedure, you must configure the primary and secondary nodes on the respective machines.
Configure Primary Node
To set up a primary node in Wyn Enterprise:
Install Wyn Enterprise on the primary node machine.
When installed successfully, open the Wyn Enterprise portal, i.e., http://localhost:51980/admin on the web browser.
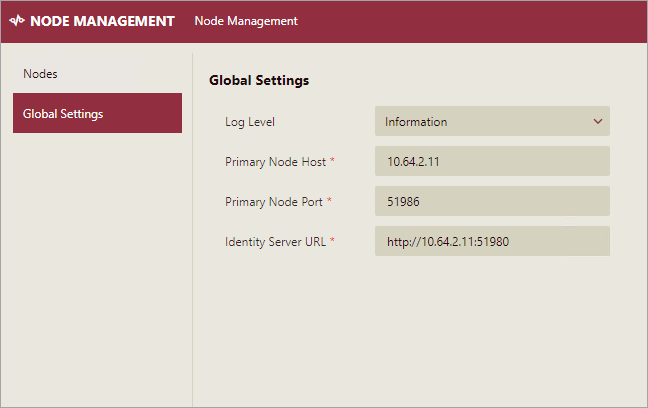
Then, navigate to the Node Management page on the Admin Portal.
Configure global settings for the primary node machine.
Configure Secondary Node
To set up a secondary node in Wyn Enterprise:
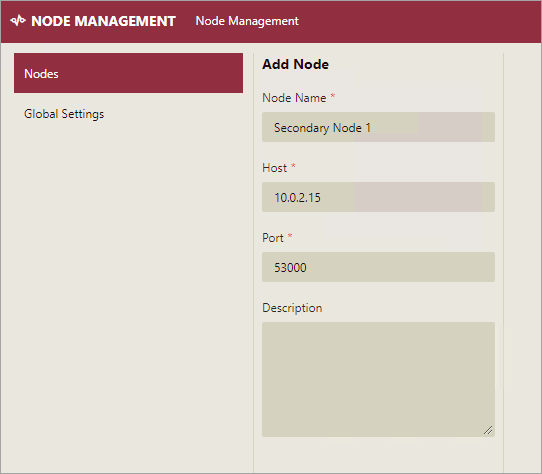
Navigate to the Nodes tab and click the Add Node button. See the Add Secondary Node help article for information on adding a secondary node.
Note that the status of the secondary node is Offline. Therefore, you need to install the node on the machine where the secondary node is located.
Install the secondary node on the machine using the How To Install section at the bottom of the secondary node page.
i) Download and install ASP.NET Core Runtime (recommended version 6.0.4) on the secondary node machine. Make sure to download the Windows Server Hosting Bundle Setup.
ii) Click and download the binary.zip file. Unzip the file and copy it to the secondary node machine to a newly created folder Wyn, at this location – C:⧵Program Files⧵Wyn.
iii) Run the command line as an administrator and execute the shell script using the following command,
.⧵install.batObserve that the status of the secondary node now changes to Online.
Tip: Turn off the firewall on the machines or ensure the ports listed on this page are open.
To install multiple secondary nodes, please repeat the above steps.